


OptiSolex SolexBrick S1
- World's 1st 4-Channel controller: 4-channel design delivers faster response, greater stability, and higher efficiency.
- Panel-Level Optimization: Mix any panel with S1 for efficient output.
- Unlimited Mix & Match: Any brands/wattages,no efficiency loss and zero rewiring.
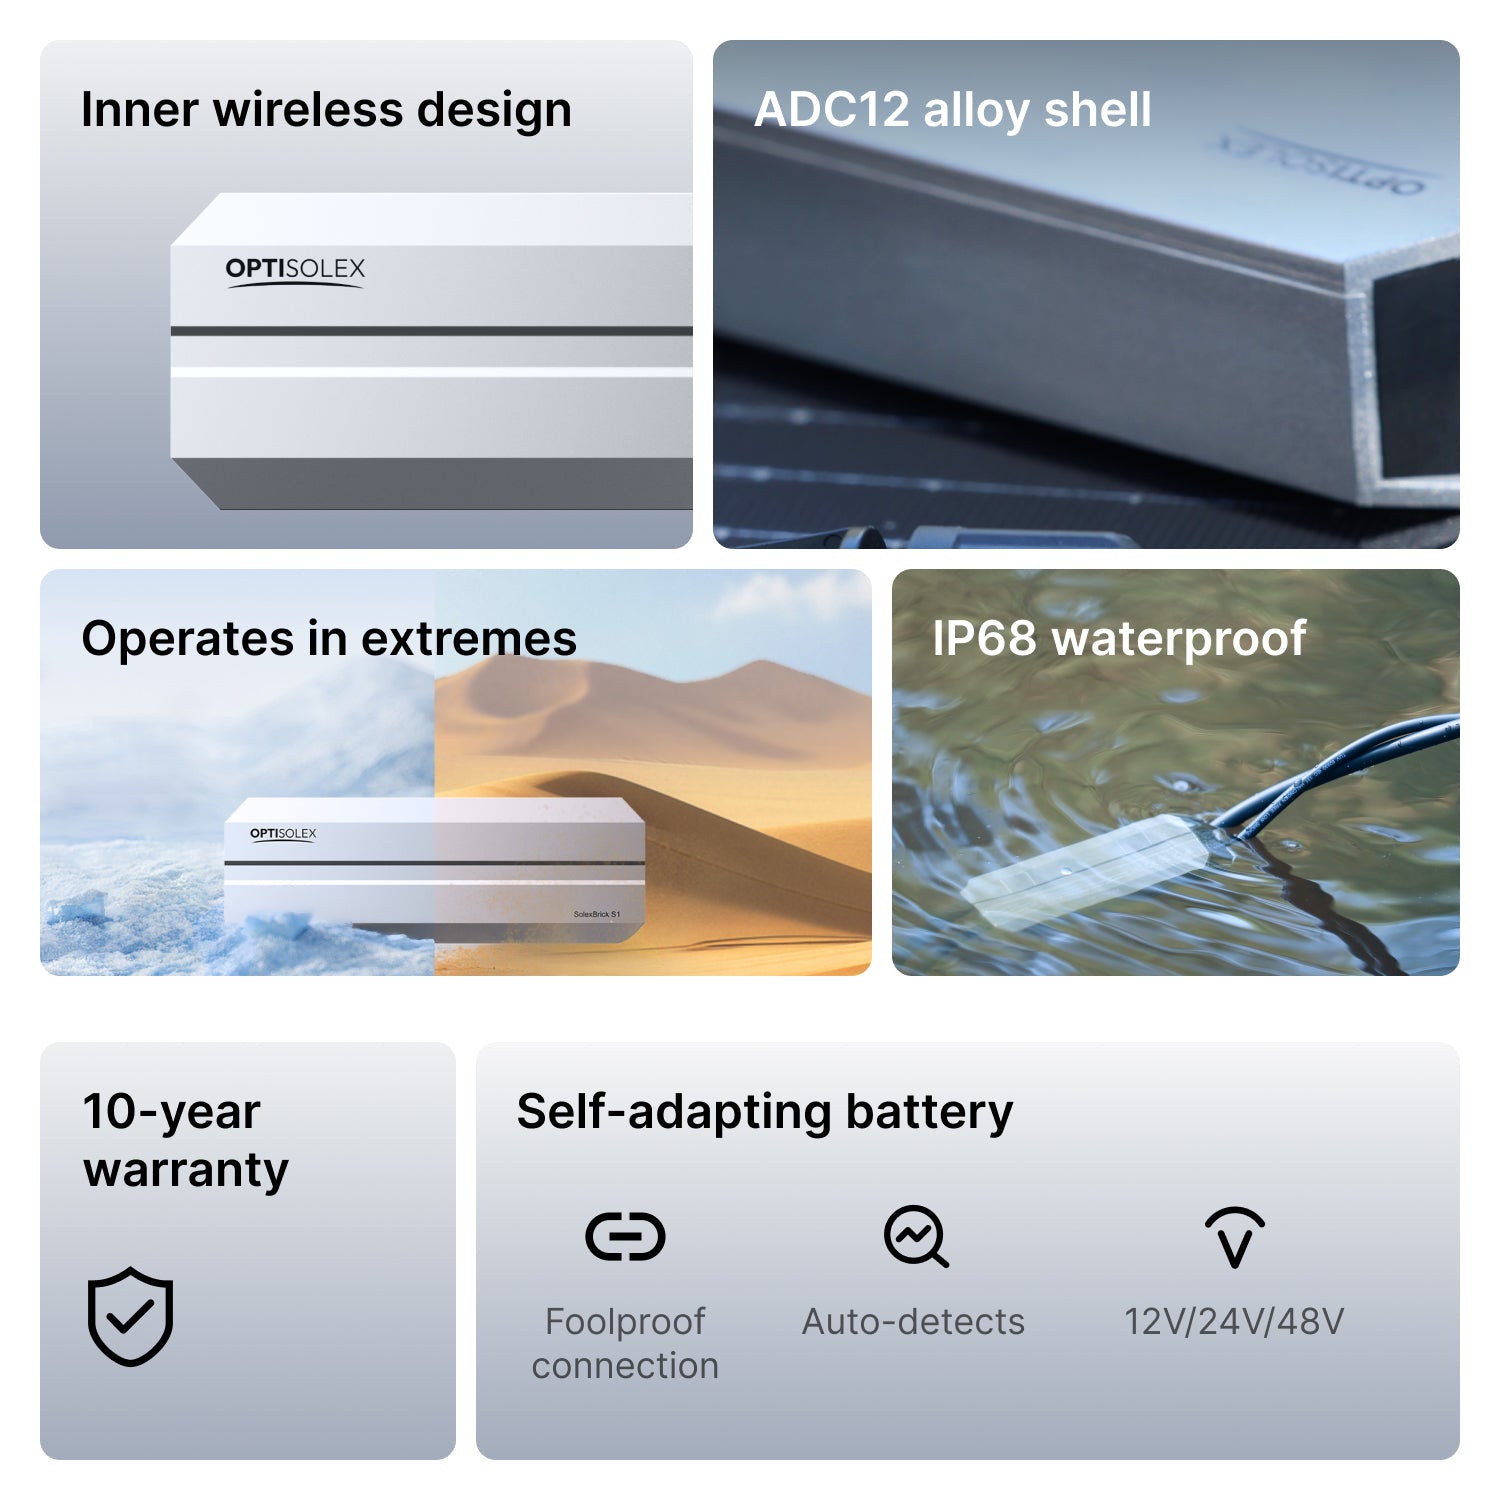
- Tough: 10-year warranty, IP68 waterproof, -40°F to 149°F, ADC12 alloy shell.
- Plug&Play Ready: 5-min setup,12/24/48V self-adapting battery.
Built for Mobility Off-Grid Power Systems Supports 12/24/48V Systems up to 50A

MPPT
Up to 99.5% Tracking Efficiency
Up to 98% Conversion Efficiency

Compact for Mobility

Plug & Play
Expansion

Panel-Level
Optimization

Mix & Match Panels
Mix different brands, specs, types of
panels freely.

Anti-Shadow Optimization
Shade one panel, the rest still shine

Tough & Robust
Automotive-Grade Aluminum Alloy Shell

-40°F to 149°F

IP68 Waterproof

Built to last
· 10-Year Warranty
· Fully Certified
Compact Size, Flexible Mounting
At just one-sixth the size of a traditional controller, the SolexBrick S1 fits almost anywhere—mount it directly behind a solar panel or tuck it inside a portable solar suitcase. Free up valuable space in your RV, van, or overland rig for the gear you really want to bring, without compromise.

OptiSolex Solar System
No interior space needed – bring more gear

Other Solar Systems
Takes up interior space + needs cooling clearance
SolexBrick S1:
Smaller. Smarter. Stronger.

S1 Controller (50A)

Traditional Controller (50A)
$159.99
$250+
1/6 The size — saves space
Bulky — takes up interior space
Plug & play installation
Needs mounting & wiring
Smart communication between S1s
No communication between units
Auto-detects battery voltage
Manual voltage switching needed
Metal shell — heat & drop resistant
Plastic shell — fragile & heat-sensitive
IP68 waterproof
Not waterproof
10-Year Warranty
2–5 year warranty
Zero-Wire Hassle: Plug & Play
No wiring needed - just plug in to avoid loose connections and short circuits. Designed for complete beginners, with error-proof connectors.


10min
2+ hours. One mistake can kill the entire install.
No learning curve
Electrical skills needed
Screwdriver, banner
Screwdriver, wire stripper, drill, waterproof tape, cable ties, multimeter...
Foolproof design
Polarity/loose wire risks
3 steps setup
Cumbersome Steps
Scaling Made Simple
Effortless Portable Solar Expansion
The 440W SolarBag Kit gives you instant solar expansion—no roof space required. Just plug into the S1 controller and connect directly to your battery. No mounting, no rewiring, no extra charge controller needed.
Future-Proof Mountable Solar Expansion
Future-proof from day one. With the S1 as your controller, adding more rigid panels later is a breeze: just plug in another S1 to expand—series or parallel, no hassle, no rebuild, more power.
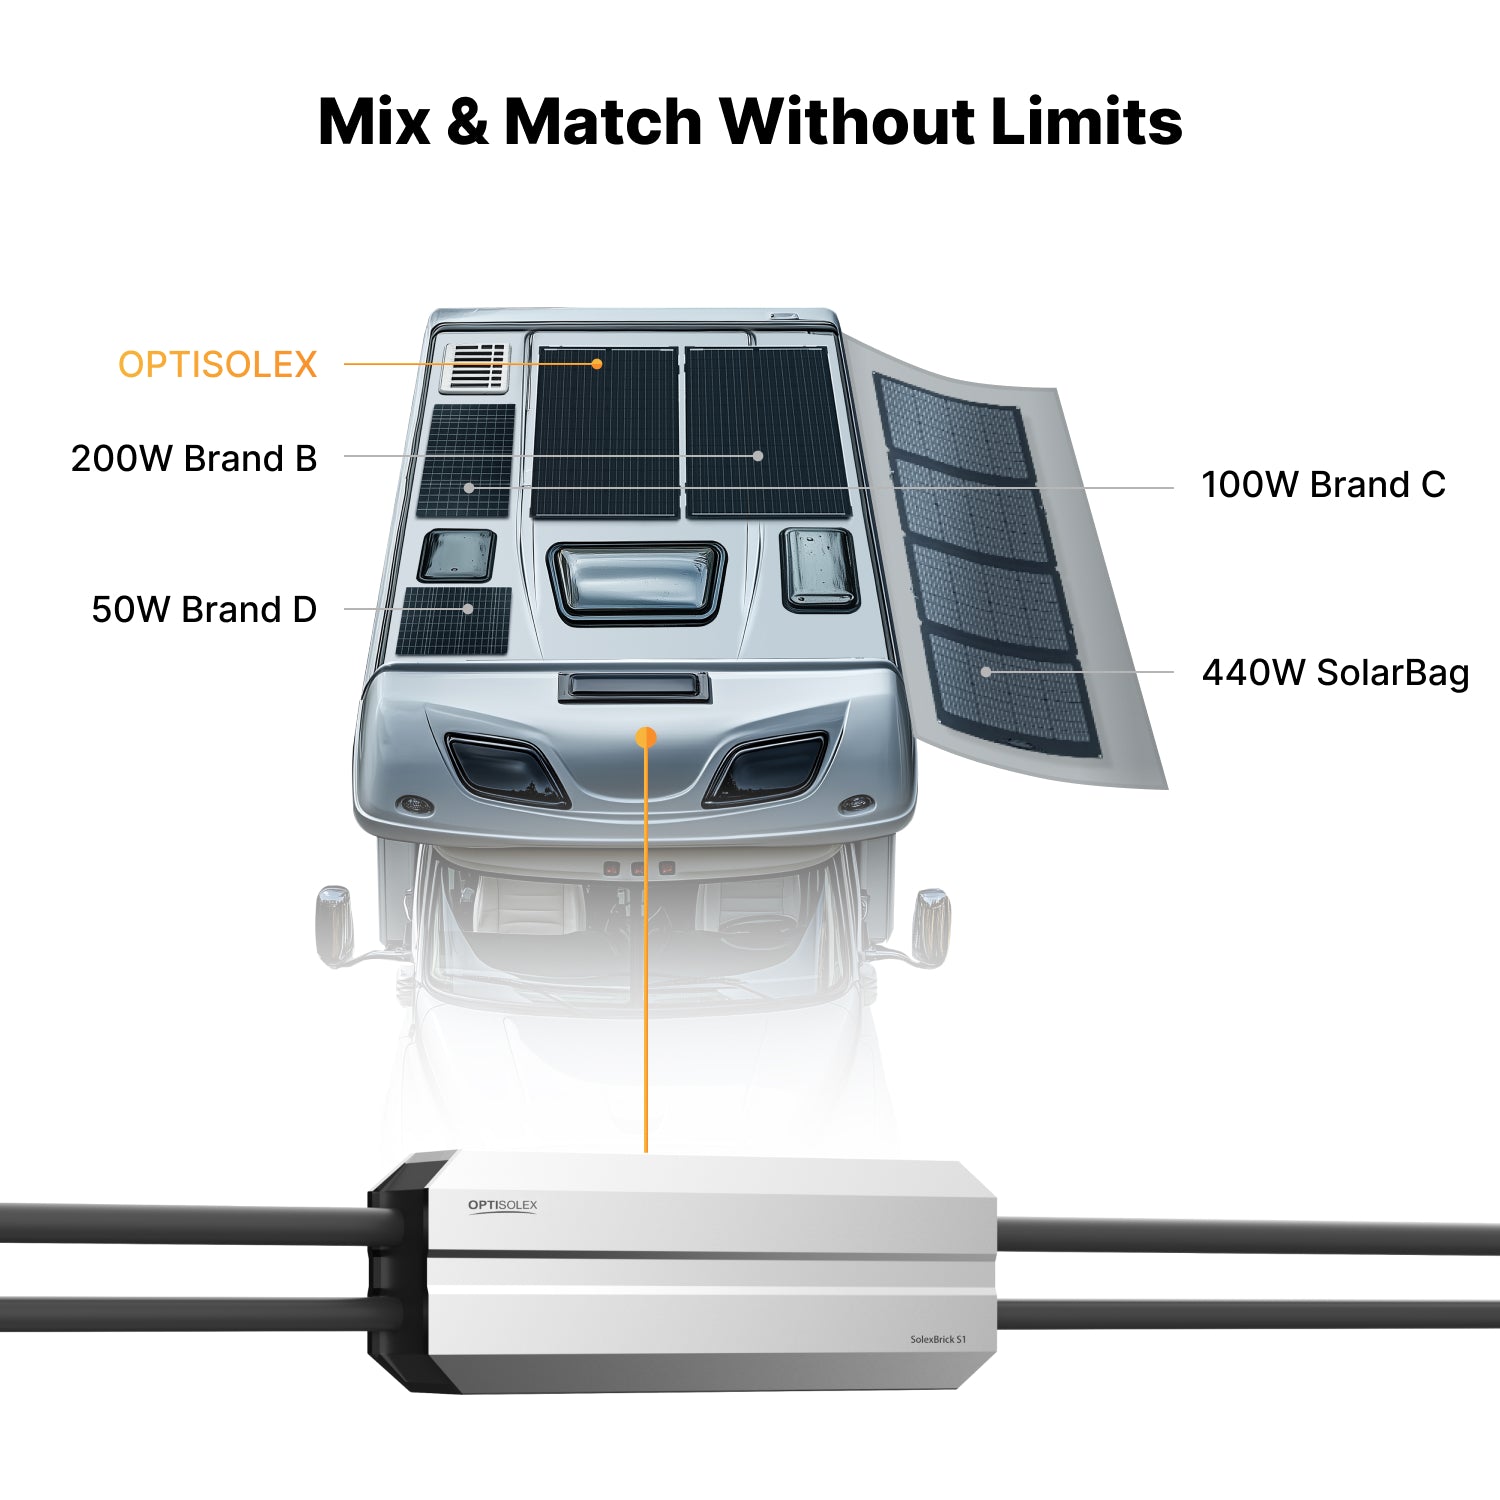
Mix & Match Different Panels
Add Panels Easily

Maximize Roof’s Potential

Compact & Space-Saving

Mix Brands
Use any brand to replace damaged panels – no brand restrictions, no upgrade headaches.

Mix Specs
Mix 100W and 200W panels seamlessly to utilize every inch of your RV roof - no wasted space, no compromise on power.

Mix Types
Combine rigid and flexible panels to create a custom energy solution that perfectly fits your unique space and power needs.


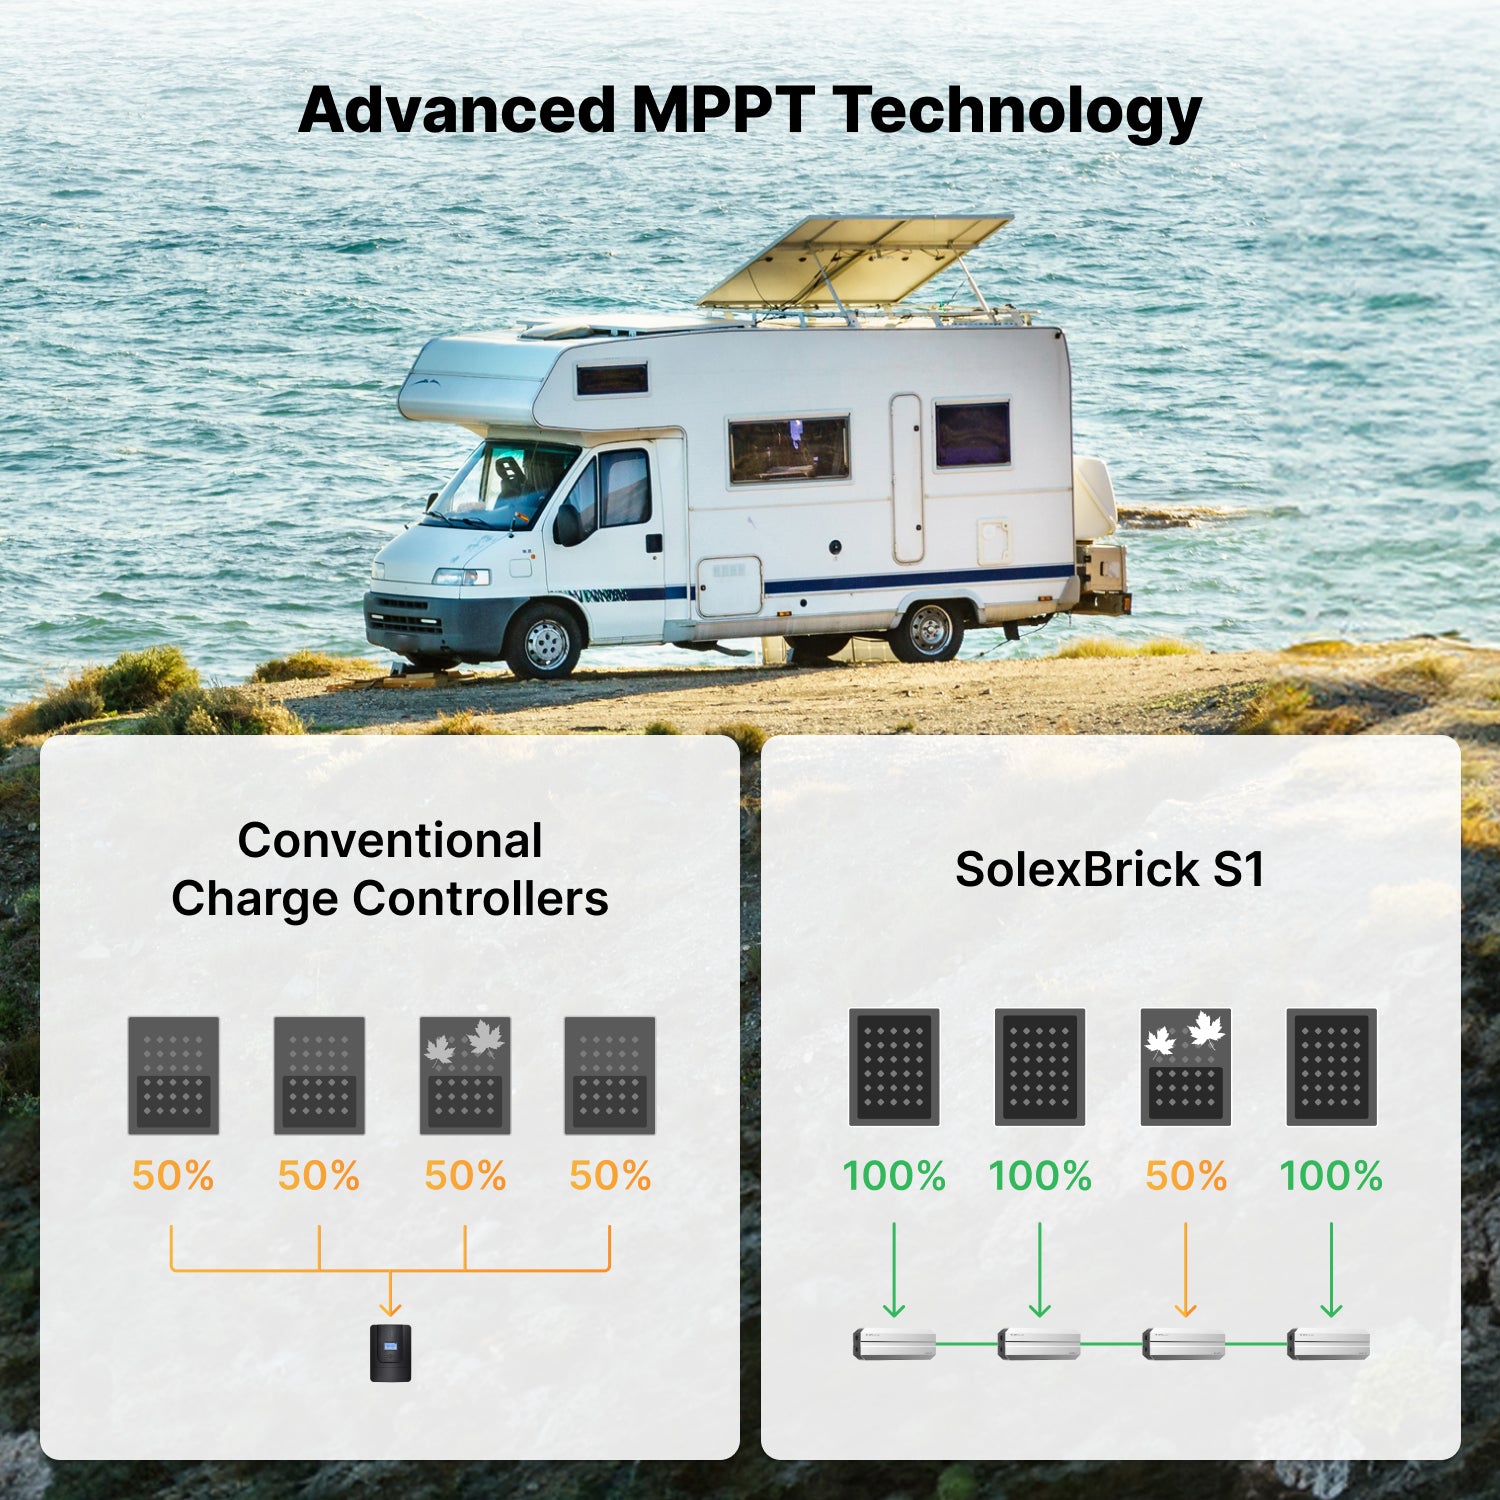
Anti-Shadow Optimization
Because S1 independently optimizes each panel, it breaks through the limitations of traditional controllers and can maintain 100% normal power generation of other panels even when the sun's angle changes/shadows from obstruction on a single panel, greatly improving the power generation efficiency of the system throughout the day.
Built for Mobility Solar System
No manual adjustment needed—The SolexBrick S1 automatically detects and adapts to 12/24/48V battery voltage through its algorithm, making it worry-free.


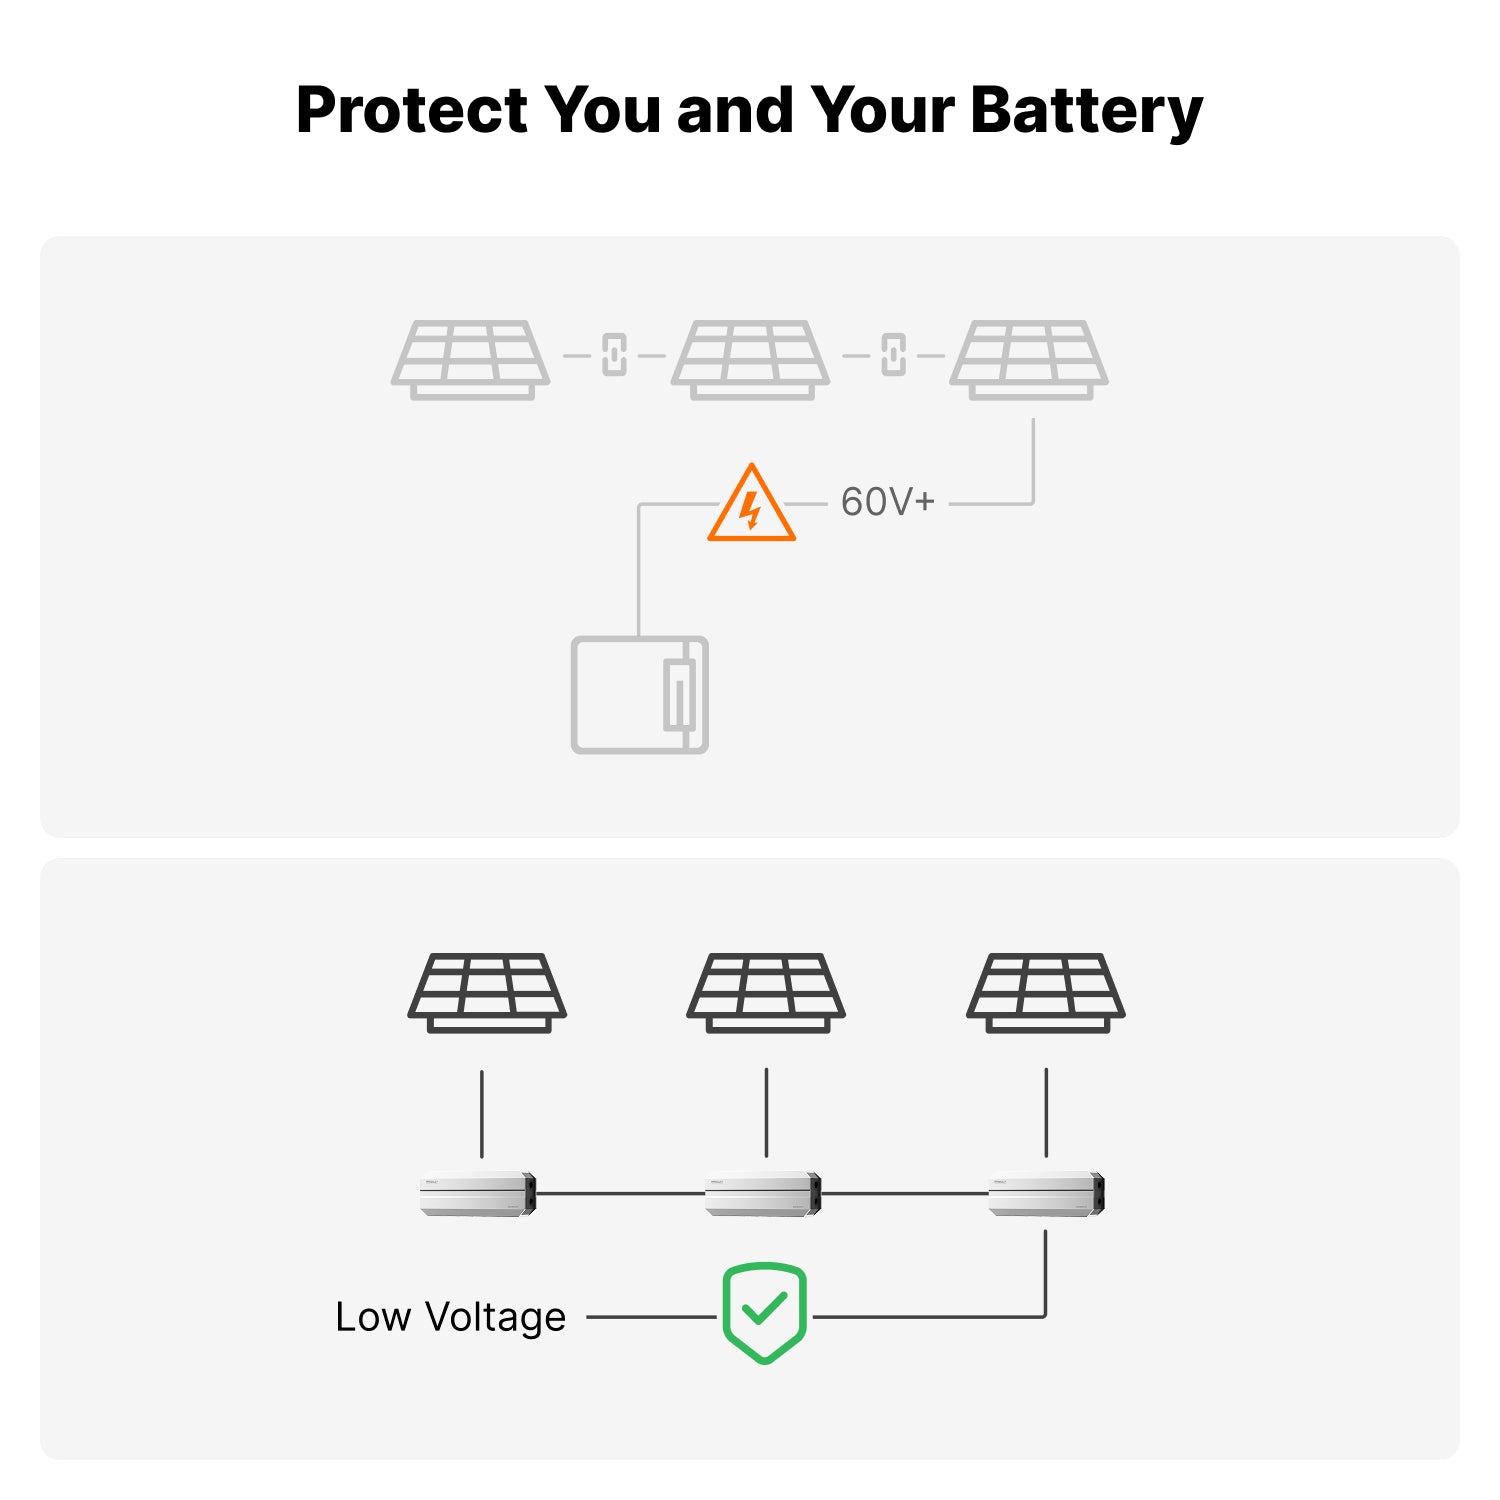
Multiple Protections for LiFePO4
The SolexBrick S1 delivers comprehensive lithium battery protection, guarding against overcharging, over-discharging, short-circuting, overloading, reverse current and lightning strike.

Certified & Reliable with 10-Year Warranty
Certified to meet FCC, CE, UKCA, RCM and RoHS standards. All backed by an industry-leading 10-year warranty for total peace of mind.

OptiSolex Ecosystem for Peak Performance
True performance isn't just about higher numbers—it's about harmony. The SolexBrick S1, 440W SolarBag, and 200W Mountable Solar Panel are engineered to fit together seamlessly, unlocking the system's full potential. From blazing efficiency in the sun to thoughtful storage and mounting design, this ecosystem doesn't just power your journey—it frees you to enjoy it.


One S1, Total Power Control
For peak performance, we recommend pairing each panel with its own SolexBrick S1. But even one S1 powering the whole array still beats most standard controllers in efficiency and control.

One S1 to One Panel

Other Solar Systems

Other Solar Systems
Nanosecond response time
Nanosecond response time
Slow & Unstable
✔ Easy Setup
✔ Easy Setup
✔ Anti-Shadow
✔ Mix & Match
More You Buy, More You Save

S1 (Single Unit)

S1 (2-Pack)

S1 (3-Pack)
$159.99
$287.99
$407.99
450W
2x S1 in series: 460W
2x S1 in parallel: 900W
3x S1 in series: 690W
3x S1 in parallel: 1350W
- ✔ Plug & Play Instation
- ✔ Future-Proof Expansion
- ✔ Plug & Play Instation
- ✔ Future-Proof Expansion
- ✔ Mix & Match Panels
- ✔ Anti-Shadow Optimization
- ✔ Plug & Play Instation
- ✔ Future-Proof Expansion
- ✔ Mix & Match Panels
- ✔ Anti-Shadow Optimization
Specifications
SolexBrick S1

10-50 VDC
Auto 12/24/48V
50A
230W@5V, 450W@12V
MCS230
10AWG DC Output Cable 8AWG
-40°F to 149°F/-40°C to 65°C
0%-99%, No Condensation
5000m
111.0*4.2*3.0cm(4.33*1.6*1.18 in)
300g (0.66 lbs)
What's in the box
Support
How do I connect multiple solar panels to my system? Should I use a serial or parallel configuration?
S1 supports parallel or series. No quantity limit in parallel, series: up to 3 S1 in series at the same time. As long as it's under 50V&450W.
Can I mix different solar panels?
Yes. Combine panels of any brand, wattage, or type. S1’s distributed MPPT ensures each panel performs at its maximum, eliminating compatibility issues.
How do I install the SolexBrick S1 controller?
Simply connect each SolexBrick S1 directly to a solar panel via MC4 connectors—no expertise required. The 3-step setup (attach S1 to panel, link panels, connect to battery) takes minutes. No bulky central controller or complex wiring is needed.
What are the advantages of Optisolex MPPT technology?
MPPT advantages: S1's 4-channel design boosts reliability and stability, InstantMax ensures real-time peak efficiency, panel optimization maximizes output under shade, and intelligent system sync connects units seamlessly.
Why is correct polarity and correct port connection important?
To prevent damage to the SolexBrick S1, please always double-check the positive/negative terminals and ensure you are connecting to the correct ports.
Short cable → Solar panel input
Long cable → DC output to the battery (via the power extension cable)
Reversed polarity or connecting input/output incorrectly may cause irreversible damage.
Why is the initial charging power so low when I first connect the system?
This is completely normal. During the first 3 minutes, the system performs an initialization and self-check, allowing only a small current to flow. After that, it will automatically enter MPPT mode and deliver normal charging performance.
Why does the SolexBrick S1 feel hot during operation?
If the solar input reaches around 350W, the device’s temperature may rise to 60–70°C.This is within the normal operating range.Please avoid touching metal surfaces during high-power operation to prevent discomfort or burns.
What type of battery is compatible with the SolexBrick S1?
The SolexBrick S1 works only with LiFePO4 (Lithium Iron Phosphate) batteries.Please make sure the connected battery is a LiFePO4 battery, is not damaged, and is functioning properly. Using other battery types may cause the system to malfunction or fail to operate.
How to Connect Multiple SolexBrick S1s for a Modular Solar Setup
SolexBrick S1 User Manual
PDFWhat do our users say?

ReeWray Outdoors
99.8K subscribers
Off-grid expert Reewray Outdoors shows how OptiSolex SolexBrick S1 unlocks higher real-world power from each panel. His tests prove major gains in mixed panel setups and shaded conditions — delivering more watts when they matter most.

Frugal Off Grid
100K subscribers
In this video, Frugal Off Grid, a 5-year off-grid homesteader, highlights the OptiSolex 400W Portable SolarBag and its SolexBrick S1 MPPT controller. He emphasizes how the S1 makes the 440W SolarBag kit more convenient by allowing direct connection to lithium batteries. He also highlights the kit’s compact, modular design and easy, plug-and-play setup.

Woodswalker 1965
25.1K subscribers
Camping lover Woodswalker hits the trails of the Pacific Northwest with gear that keeps every mile powered. See how 440W of compact and portable solar fits into real overlanding adventures.